
Looking after your camera gear: a guide for beginners

Save yourself some expensive and embarrassing mistakes: this quick read will tell how to look after your camera and extend the life of your gear.
If you need help with the basics, join Emma’s beginner’s online photography course here. The course is free for a year by email and there is a low-cost app if you want to join the community.

Dust and grease

Those spots (and worse) on this image are not rain, birds or UFOs: they are dust and hair on the camera’s sensor. Anything that comes between the scene and the sensor will spoil your image, whether it’s dust on your sensor or thumbprints on your lens.
How to clean your sensor
If you scratch your sensor you will need a very expensive repair or a new camera. If you are in any doubt about whether you can safely clean your own sensor, don’t. Send it off to be cleaned or take it to a camera shop to do it for you.
Before we start: never, ever blow onto your sensor to try and clean it. You will spray saliva which will dry or smear on the sensor and then you are worse off than before you started.
The safest way to clean a sensor is by not touching it. Use a specialist air blower to dislodge all but the most stubborn dust specks (preferably a blower with a filter on the air intake end to stop the brush blowing more dust into the camera).
Engage sensor cleaning mode (check your manual).
Hold the camera with the sensor facing downwards so any dislodged dust will fall to the floor.
Blow air gently at the sensor without touching the sensor.
If you still have dust you can try using a static cleaning brush or, if you really need to, a wet swab.

To avoid having to clean your sensor, never change your lens. This isn’t practical, so avoid changing your lens anywhere with dust, wind, rain, snow or sand.
How to change your lens safely
Always turn the power off to avoid a static charge attracting dust.
Have your new lens ready with the back cap off.
Have a place clear to set your old lens down.
Hold your camera pointing downwards to avoid dust drifting in.
Work very quickly.
How to clean a lens
A scratched lens is easier to repair than a sensor because it is only the front element that will need to be replaced, but it is still an expensive option. Use a non-abrasive microfibre cloth or a dedicated lens-cleaning cloth. For thumbprints and grease you may need to use a cleaning fluid but only use something designed to be used with camera lenses.
Extreme temperatures
Your camera and all its expensive electronics will not perform well in very hot or very cold situations. Extreme heat may cause permanent damage; too cold and the batteries will drain very quickly. Don’t forget that leaving your camera in your car will leave it exposed to exaggerated ambient temperatures regardless of the theft risk.
You can check the range of temperatures your camera is designed to work in on the manufacturer’s website.
Stop condensation forming on your camera
If you move your camera from a cold place to a warmer one, condensation will form on it; for example when you visit a botanical hot house and your lens instantly becomes covered in condensation or when you move from your air conditioned house to shoot outside. Less obvious is when condensation forms inside your camera, maybe fogging your images or causing short circuits in the electronics.
Allow your camera to change temperature slowly to avoid condensation, and if that’s not possible leave your gear sealed in a plastic bag until the temperature equalises.
If you live or work in very humid areas you will need to clean your camera often to avoid mildew forming, and possibly keep silica gel packets stashed in your camera bag.
Water
Electronics and water don’t mix. If you get your camera wet you risk short circuits, rust, mildew and permanent damage. Check how much rain your camera is designed to endure. It is only dedicated underwater cameras that are completely waterproof. More expensive cameras may be “weather sealed” – this is designed to give some degree of protection against the rain but weather sealed cameras are still not guaranteed waterproof.
Camera dropped in water
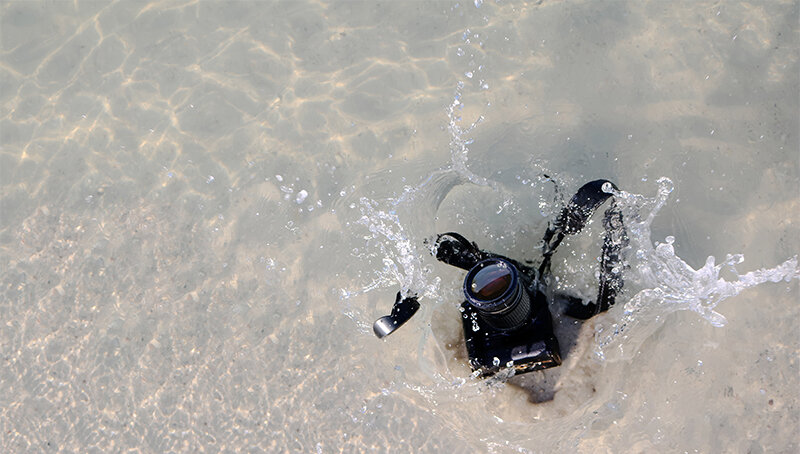
If you drop your camera in water don’t panic. I dropped my Fuji XT1 in the sea and it was OK (after a modestly priced service).
Accept that you aren’t going to be able to use your camera for a few days.
Switch the camera off and take out the batteries.
If the water was the sea do not twist the lens barrel because there is probably sand trapped in there. If you move anything the sand will scratch internal elements. Rinse your camera carefully in clean water to wash the salt off.
Gently dry off any standing water but don’t poke inside the camera in case you push water drops further inside. Once the outside has been towelled off take out the memory cards and take off the lens.
Leave everything somewhere warm and well ventilated to dry out, using silica gel packets alongside if you have them. Some people say rice works, but don’t pack your camera in rice just leave it in an open bowl and put camera and bowl in a sealed bag. After 3-5 days you can see if it’s working again.
If you think it is badly damaged send it for a repair as soon as you can, packing it along with silica gel so that it can continue to dry out in transit.
If your camera was completely submerged for any amount of time, or if you dropped it in the sea, send it for a service even if it seems to be working. There may be mould or corrosion forming inside the camera that takes a while to grow. An early service can stop problems forming later on.
Your insurance probably covers accidental damage repairs.
Dealing with rain
It’s easy enough to stop rain getting in your camera: cover it up. Use yourself, your coat, an umbrella, a plastic bag or a dedicated camera cover. Keep a super-absorbent camping towel in your camera bag to keep wiping the water off the camera, and a separate non-abrasive cloth to keep the lens clean.
Check your lens between shots for raindrops and use a lens hood if you have one to keep the rain at bay.
How not to carry your camera gear
Never carry your camera like this:
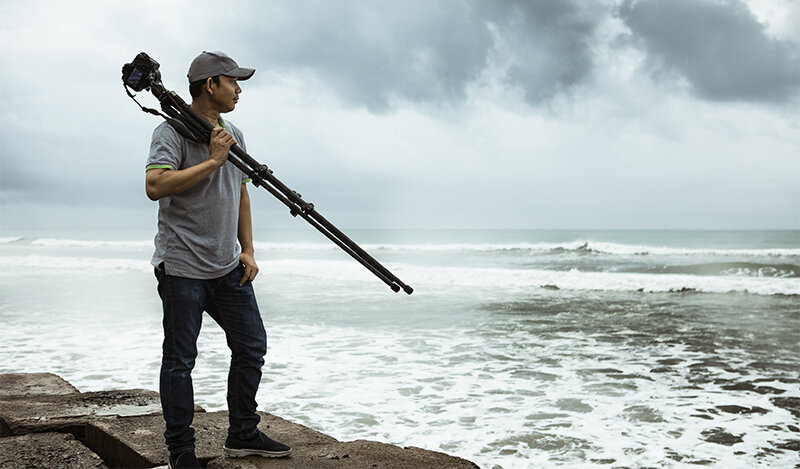
Image shows a man holding a collapsed camera tripod over his shoulder with the camera attached. Don’t carry your gear like this.
That expensive camera is now attached by a single thread to the tripod: the tripod plate is the weakest link and if it unscrews or fails your camera will smash to the ground.
It’s also good practice never to carry a camera around your neck with a long lens attached. The weight of the lens can, over time, damage the lens mount.
Looking after memory cards
Always switch your camera off before you take a memory card in or out. If the camera is on, you risk damaging the card due to the electrical current.
Avoid deleting images from within the camera's menu system, or via your computer. The memory card is a small hard drive, and you can start to get corrupted images if you keep using the "delete image" option. This is because of the way the card marks images to be overwritten rather than completely deleting them, if you use this method.
To delete images and keep your card healthy, simply use the "format card" function in your camera. Make sure you have downloaded and backed up your images first. The format function does a better job of keeping the card in good working order, and it has the added benefit of preparing the card to be using with that particular camera. Which brings us to:
Don't swap cards between cameras without formatting them.
Basic good practice
Don’t leave your camera bag closed but unzipped. It’s either completely open or it’s closed and zipped. This prevents catastrophe striking when someone moves your bag thinking it’s zipped closed. They pick it up by the top handle and everything inside falls out and breaks because it wasn’t zipped closed.
In your car: give your camera bag a seatbelt to prevent damage if you have to brake suddenly.
Keep a small roll of duct tape or painter’s tape in your bag. It’s great for holding broken things together so you can finish your shoot and covering up your viewfinder for a long exposure.
Store everything in the same place in your bag so you don’t have to open every last pocket to find a spare battery or a new memory card.

Join A Year With My Camera
A Year With My Camera is Emma’s flagship beginner’s camera course. It’s free for a year by email. There is an app to download if you want to join the optional community (small annual subscription). Join here and get started today: